Vistas de página en total

domingo, 23 de diciembre de 2012

Pollo en Pepitoria


Un préstamo del Blog: Navidad Digital

Pollo en Pepitoria

  • 1 buen pollo de corral (hoy, "de marca" buena)
  • 1 taza de aceite virgen extra
  • Caldo ligero de carne o ave
  • 1 chorrito de vino Oloroso de Jerez
  • 3 yemas de huevos cocidos
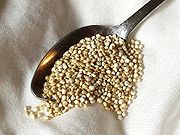
  • 15 ó 20 almendras sin tostar ni salar (sin piel)
  • 1 buena cebolla
  • 2 dientes de ajo
  • Azafrán de verdad (si es con D.O. Mancha, mejor), no colorante
  • Harina
  • Perejil
  • Sal y pimienta.
  1. Corto el pollo en trozos que sazono con sal y pimienta y rebozo con harina; los doro bien en el aceite (ojo, que no se queme ni el pollo, ni la harina que éste suelta por la sartén). Ya dorados, los escurro y coloco en una cazuela (mejor de barro).
  2. Escurro aceite de la sartén para que no haya exceso (también algo de la harina que se haya posido quemar), y en ese mismo aceite blanqueo la cebolla picada; cuando está, vuelco la sartén en la cazuela sobre los trozos de pollo,... rehogo un poco, echo el chorrito de Oloroso, y después el caldo hasta cubrir el pollo; que hierva muy suavemente.
  3. En un mortero majo el ajo -previamente asado sobre una sartén sin aceite-, el perejil, las almendras y el azafrán -previamente tostado-, e incorporo el majado una vez que el pollo dio su prmer hervor.
  4. Las yemas las pico mucho y añado la mitad al guiso cuando el pollo está a media cocción (es para que la salsa engorde un poco,... importante encanto de este plato), y la otra mitad, ya con el pollo en la fuente de servir, para adornar.

martes, 11 de diciembre de 2012

Pollo con salsa de anticucho

Nuestro típico anticucho hecho con carne de res, es exquisito y tradicional en nuestro Perú.  Sin embargo, hay personas a las que no les gusta comer entrañas, asi que les doy una alternativa: prepararlos con piernitas o encuentros de pollo.

Para seis personas:
12 piernitas o 12 encuentros de pollo
sal, pimienta, bastante comino, ajos molidos, 1/2 taza de ají panca o ají colorado, 2 cucharadas de ají amarillo
Una taza de vinagre blanco
Un poco de cerveza negra
Dejar marinar el pollo por 24 horas.
Hornear  a una  temperatura de 350 grados F, hasta que esté dorado y cocinado por dentro (se pincha y si no sale sangre, ya está).

Se puede acompañar con puré de papas, con yuquitas fritas o con ensalada.

Pastelón de Plátano: Banana Casserole

Hace años, cuando mi hijo vivía en Miami, teníamos un restaurant preferido adonde nos gustaba ir a comer.  Queda en el barrio cubano y su nombre es el Versailles.  La comida es riquísima y los precios son bastante buenos, pero su plato estrella es el Pastelón de Plátanos. Siempre quise saber la receta, hasta que un día, una señora dominicana me la dio. Pero no fue hasta hace poco, que me decidí a hacerla y me quedé encantada con el resultado.  Como no soy egoista, allí se las paso.
Para ocho personas:
6 plátanos dulces maduros (si están medio negritos, son más sabrosos)
3 cucharadas de mantequilla
leche evaporada
3 huevos

Relleno:
Una cebolla mediana picada
3 dientes de ajo picados
1/2 libra de carne  molida
1 tomate pelado y cortado en cubitos
1 pimiento rojo picado
una hoja de laurel
Sal, pimienta y orégano
Una cucharadita de cilantro cortado o en polvo
un chorro de Sherry
pasas (opcional)

Preparación:

Pelar y cocinar los plátanos por alrededor de 15 minutos   Majarlos con la mantequilla y echarles un poco de leche hasta aflojar un poco la masa.  Dejar enfriar y echar los huevos a esta mezcla y envolverlos muy bien. Reservar.

Hacer un aderezo de la cebolla con los ajos, cilantro y tomates. Agregar la carne molida y el pimiento rojo picado y dejar freir. Echar el laurel, pimienta, orégano, sal y poco de pimentón o sazonador rojo.  Agregar las pasas y el Sherry.  Retirar la hoja de laurel, una vez listo el picadillo.

En un pyrex  enmantequillado de regular tamaño, poner al fondo la mitad de la masa de plátanos (cuidar de que no esté muy seca; y si así  fuera, aflojarla con un poco más de leche evaporada).  Verter todo el preparado de la carne molida y cubrirla con la otra mitad de la masa de plátanos.  Echarle encima abundante  queso mozarella rallado y poner al horno a 350 grados F. hasta que dore y servir de inmediato.

English Version:  Courtesy of Ana Sofía Pelaez from the Cooking Channel:
This is a slight variation from my Spanish version:

Pastelon de Platano Maduro

Recipe courtesy Ana Sofia Pelaez 
TOTAL TIME:2 hr 5 min
Prep:35 min
Inactive Prep:--
Cook:1 hr 30 min
YIELD:
LEVEL:--

INGREDIENTS

  • 1 pound lean ground beef
  • 2 tablespoons annatto infused oil or canola oil*
  • 1 green bell pepper, chopped
  • 3 aje dulce also known as ajicitos, chopped
  • 1 medium white onion, chopped
  • 3 cloves of garlic, minced
  • 1 cup peeled whole tomatoes, fresh or canned, crushed or roughly chopped
  • 1/4 cup dry sherry
  • 1-2 tablespoon raisins (optional)
  • 1 whole bay leaf
  • 1 teaspoon kosher salt
  • 1 teaspoon dried oregano
  • 1/2 teaspoon freshly ground pepper
  • 3 recao leaves (also known as culantro), finely chopped (cilantro can be substituted)
  • 1/4 cup red roasted peppers, chopped
  • 1/4 cup green olives, sliced
  • 2 tablespoons capers
  • 4-5 plantains, mostly yellow with some black spots, trimmed and cut in half
  • 8 cups of water
  • 2 tablespoon unsalted butter, melted plus more for greasing
  • 1/2 cup queso blanco or parmesan, shredded

DIRECTIONS

Preheat oven to 350 degrees. Butter a 139 inch baking dish and set aside.
To make the picadillo, heat the oil in a large skillet over medium heat. Add the chopped green peppers, ajicitos and onions. Saute until beginning to soften, about 3 minutes. Add the minced garlic and cook an additional 2 minutes. Add the ground beef, breaking it up so there are no lumps. Stir in the tomatoes,sherry, bay leaf, salt, and pepper and raisins if using. Return to a low simmer, cover, and continue to cook an additional 15 minutes. Add the chopped recao, red peppers, olives andcapers. Remove bay leaf, adjust seasoning to taste, and set aside.
Combine the water, salt and unpeeled plantains in a large pot. Bring to a high simmer, cover and continue to cook an additional 15 minutes. Remove from heat and drain. When cool enough to handle but still warm, peel, place in a large bowl and mashtogether. Stir in the melted butter to combine.
Add half the plantain mixture to the prepared baking pan and spread to form a smooth layer. Top with the prepared picadillo. Cover with remaining plantain mixture and sprinkle with shredded cheese.
Bake in preheated oven until it is warmed through and lightly browned, about 20 minutes.
*Notes: To make annatto oil, combine 1 cup of canola or olive oiland 1/4 cup of annatto seeds (also known as achiote) in a smallsaucepan. Bring to a simmer over low heat, stirring often, until it turns bright orange, about 3-5 minutes. Remove from heat and allow steep an additional 15-20 minutes. Drain and discard the seeds. The oil can be covered and refrigerated for up to 2 months.


Relleno de Pavo para Navidad

Aunque en mi entrada  del año pasado sobre Navidad con Gastón Acurio, ya van incluidas algunas recetas entre las que se menciona el relleno para el pavo, aquí les presento una versión que la vengo guardando desde hace muchos años y que es bastante buena.  Les recomiendo no rellenar el pavo con esta mezcla, porque se corre el riesgo de que el pavo se cocine antes que esta y que al sacarlo, el relleno pueda albergar bacteria.  Por otro lado, si se cocina mucho el pavo con el fin de asegurarse de que esto no pase, éste tiende a secarse.  Lo mejor es hacer el relleno aparte, y así se obtendrá un producto más compacto y no tan asopado como el que saldría del vientre.
Bueno, allí va la receta:
Aceite de olivo
Una cebolla grande, puede ser roja o blanca
4 dientes de ajo machacados
Un tomate picado
Sal,comino, pimienta, pimentón rojo
Un cubito de caldo de pollo
Un pan grande remojado y exprimido
1/2 libra de carne molida de res
1/2 libra de carne de chancho
1/2 libra de salchicha o chorizo
Un hígado de pavo picado
3 tiras de tocino
1 cajita de pasas
1/2 taza de nueces
1/2 taza de aceitunas picadas
Una taza de manzanas picadas
1/2 taza de apios picados
4 huevos
1/2 taza de perejil picado

Hacer un aderezo con la cebolla y los ajos, agregar las carnes y freirlas hasta que se cocinen.  Echar  luego, los tomates, el apio y las frutas y aceitunas y nueces.  Agregar el pan remojado y exprimido. Dejar cocinar un poco.  Ya al último, mezclar bien los cuatro huevos dentro del relleno.    Si se quiere, echarle un poco del jugo del pavo que se está cocinando para que tome el sabor de un verdadero relleno.  Si se quiere, meter dentro del buche del pavo  y cocerlo el con una aguja gruesa y pabilo. El relleno debe servirse en una fuente o pyrex separado,


viernes, 30 de noviembre de 2012

Historia del Café Vienés y su receta

Del blog barexpres.com, les copio la receta del café vienés:
Historia del Café Vienés:

La historia del Café Vienés se remonta al año 1683. Cuenta la leyenda que las tropas cristianas apoyadas por soldados del sur de Alemania y de Polonia, en total un ejército de 85.000 soldados a las órdenes de Juan III Sobieski, rey de Polonia, lucharon contra el ejército turco dirigido por el gran visir Kara Mustafá que contaba con 125.000 soldados con los que había conseguido sitiar la ciudad de Viena durante casi dos meses. El día 12 de septiembre del año 1683, en la llamada batalla de Kahlenberg, las tropas imperiales lograron vencer al ejército otomano liberando la ciudad de Viena del asedio de las tropas turcas. La desordenada retirada de las tropas turcas dejó a las milicias victoriosas con valiosos tesoros que los turcos tuvieron que ir dejando atrás. Entre estos tesoros los turcos dejaron 25.000 tiendas de campaña, 10.000 bueyes, 5.000 camellos, una gran cantidad de oro y muchos sacos de café, algo que hasta entonces era totalmente desconocido para los vieneses y por supuesto para toda Europa por ello al principio querían quemarlos ya que pensaban que estos sacos con unos granos extraños eran alimento para los camellos. Según cuenta la leyenda, el rey polaco Jan III Sobieski concedió los sacos a uno de sus oficiales de origen polaco llamado Jerzy Franciszek Kulczycky (traductor, mensajero imperial y hombre de negocios) quien gracias al café otorgado por el Rey fundó la primera cafetería vienesa llamada “Zur Blauen Flasche“ (“La botella azul”). Después de hacer varios experimentos con el café, pensando en algunos de sus clientes a los que el sabor del café por sí solo no les terminaba de gustar, añadió un poco de azúcar y leche, y de esta manera surgió la tradición del café vienés. No cabe duda de que esta leyenda es la historia del nacimiento de una de las bebidas más consumidas en todo el mundo, el siempre deseado café con leche, y también el principio de todos aquellos otros cafés que en su elaboración incorporan leche, espuma de leche, nata montada, nata semimontada, nata liquida, leche condensada, etc. En los cafés de Viena podemos encontrar una extensa variedad de Café Vienés y por supuesto, como es costumbre en casi todos los cafés de Viena, con cada café nos servirán un vaso de agua para refrescar el paladar y así poder saborear mejor cada trago. Lista de los café vienés más conocidos Melange Mitad de café y mitad de leche caliente, se termina con espuma de leche. En realidad, este sería como el Capuchino italiano mundialmente conocido. Franziskaner Básicamente es un Melange que, sin embargo, es coronado con nata montada en lugar de leche espumosa. Kaffee Verkehrt Es un café con leche muy ligero que se sirve en vaso. Se le conoce como “verkehrt” (literalmente, “al revés”), ya que contiene más leche que café. Fiaker Es un delicioso expreso doble con un chorro de kirsch. Tradicionalmente se sirve en un vaso de cristal con asa y es coronado con nata montada y una cereza marrasquino. Maria Theresia Un doble expreso con un chorro de Cointreau coronado con nata montada y cáscara de naranja confitada. Franz Landtmann Kaffee Expreso doble con un chorrito de brandy y otro de licor de café, coronado con nata montada y una pizca de canela. Kaffee Sobiesky Un expreso doble que viene con miel y un vaso de vodka servido por separado. Wiener Eiskaffee (Café Vienés con helado) Un expreso doble se vierte sobre helado de vainilla. Se corona con nata montada, y un barquillo. Einspänner Un expreso doble coronado con nata montada y sirve con un barquillo para helado. El Einspänner es el café que se conoce popularmente como Café Vienés en todas las partes del mundo. Café Vienés (original) Ingredientes 1.Un expreso doble 2.Una cucharada de azúcar 3.Nata montada (crema batida) 4.Un poco de canela, cacao en polvo o virutas de chocolate 5.Un barquillo Preparación Preparamos un expreso doble, suave o fuerte según el gusto, le añadimos una cucharada de azúcar y removemos para que ésta se disuelva. Seguidamente coronamos el café con nata montada (crema batida) y decoramos espolvoreando un poquito de canela sobre la nata. Finalmente, terminamos con el barquillo clavándolo en la nata y a disfrutar de un autentico Café Vienés. Café Vienés con chocolate Ingredientes 1.Un expreso doble 2.Una cucharada de azúcar 3.Chocolate negro para fundir 4.Nata montada (crema batida) 5.Nata líquida o leche (para fundir el chocolate) 6.Un poco de canela, cacao en polvo o virutas de chocolate 7.Un barquillo Preparación Lo primero que tenemos que preparar es el chocolate. Para ello, rallamos el chocolate negro, calentamos la leche o la nata liquida (lo que más nos guste) y seguidamente echamos en la leche la cantidad de chocolate necesaria para poder hacer un buen chocolate con leche, si nos gusta suave ponemos menos chocolate y si nos gusta fuerte añadiremos un poquito más. A mí, personalmente, me gusta hacerlo suave ya que para mezclarlo con el café es mucho mejor. Posteriormente echaremos el chocolate en la taza o copa, unos 10 cl de chocolate por 10 cl de café, añadimos poquito a poco el café al tiempo que removemos para que la mezcla se vaya ligando, seguidamente cubrimos la mezcla con nata montada y adornamos la corona de nata espolvoreando un poco de canela y un barquillo. En cuanto al azúcar, cada uno puede echar la cantidad que más le guste sin olvidar que el chocolate y la nata ya tienen incorporado dicho ingrediente

miércoles, 12 de septiembre de 2012

Fideua with allioli

 
Catalan cuisine is a cauldron full of prawns and monkfish simmering in a rich broth in the galley of a fishing boat off the Costa Brava; it's a brace of rabbits roasting on an open fire beside a slate-roofed farmhouse in the Pyrenees while a grandmother with a strong arm beats olive oil and garlic into a thick, emphatic sauce; it's an elegant salad of white beans, celery leaves and salt cold posed on a cool black plate in a restaurant dining room in Barcelona. It's also anchovies, foie gras, pigs' feet, snails, grilled green onions dipped in spicy nut sauce, pigeon breast infused with vinegar and herbs, eggplant and peppers baked in ashes, veal braised with mushrooms, duck stewed with pears, paella, potato omelets, custard glazed with burnt sugar, fresh green figs drizzled with anisette, toasted hazelnuts still warm from the oven... (Colman Andrews, Catalan Cuisine)

The first time I was in Catalonia, I don't think I tasted a single local specialty. I was seventeen and stranded in Barcelona for two weeks, awaiting a shipment from my parents that included the Eurail pass I needed to travel around Europe for the next three months. Barcelona was supposed to be just a quick stop on my way out of Spain, a place to gather my wits before heading out to experience the wide world of Europe that lay beyond the confines of the small town in the Basque Country I'd called home for the past nine months.
To ease the transition to total independence I had accepted an offer to stay with some friends of my host family in Barcelona. While shacking up with locals is usually the ideal way to experience whatever delicacies a region has to offer, in this case it unfortunately wasn't, as the locals in question were a Syrian-American couple more interested in feeding me baba ganooj and enchiladas than introducing me to anything Catalan. The fact that I was on a skinnier-than-shoestring budget didn't help my food situation either. Even though I wasn't paying for accommodation or most of my meals while in Barcelona, my stay in the city wasn't figured at all into my overall travel plan, and I knew that spending too much there might force me to miss something unmissable later on. I had, after all, intended to be there only two or three days, but somehow that absentee shipment from my parents stretched a short stopover into an endless waiting game. So I counted out the pennies for my daily ration of bread, cheese and chocolate, and wandered the city streets alone, biding my time until I could finally leave Spain and get on with the real business of traveling.
It was another three years before I got a taste of what I had missed in Barcelona, and even then, it was barely a taste. Manuel and I had just met, and sensing that this was a guy I wanted to travel with for many years to come, I followed him back to Germany, where (never content to sit still) we hopped in his rusty old Citroën deux chevaux and drove all the way to Spain. We somehow ended up at the seaside resort of Tossa de Mar, a jewel of a village on Catalonia's rugged Costa Brava, and checked ourselves into Tossa's spacious and reasonably-priced campground. Despite sleeping in a tent, money was pretty tight, and most nights spaghetti and canned vegetables warmed on our little butane stove were about as good as it got. Our last night there, however, we managed to scrape together enough to visit one of the seafood restaurants lining the beachside promenade. There, opposite the shimmering black of the Mediterranean we ate a magnificent paella, overflowing with shrimp and mussels that had been pulled from Tossa's offshore depths that very morning, and washed it down with a big carafe of local red wine. That paella stands out in my memory as one of the best things I've ever eaten, though in all honesty I can't be sure that it wasn't just the combination of warm sea breezes and young love playing tricks on my tastebuds.
Then finally two years ago, we went back to Catalonia, and this time we got it right: we went there to eat. We spent five belly-busting days in Barcelona, confirming beyond a shadow of a doubt that not only is Catalonia's capital one of the world's greatest food cities, with restaurants both traditional and modern providing some of the most consistently amazing food at some of the world's most reasonable prices, but that Catalan food is indeed a great cuisine in its own right, or as Colman Andrews proclaimed in his 1988 book Catalan Cuisine, "the last great undiscovered cuisine in Europe".
The really unbelievable thing is that it is still undiscovered. Indeed, not much has changed since 1988; Catalan cuisine is still languishing in obscurity, conspicuously absent from the pages of magazines that still find plenty to say about the cuisines of Provence and Tuscany. Spanish cuisine (read: tapas, tapas, tapas) has had its few minutes of fame as the darling of the world's gastronomic trendsetters, but while there may be a few shared dishes and techniques, Catalan cuisine and the other cuisines of Spain are as different from each other as, well, regional cuisines all around the Mediterranean. Everyone knows about El Bulli, of course, and thanks to one uber-innovative Catalan chef everyone has heard of foams and powders and skinless ravioli, but how many people have heard of esqueixada, suquet, samfaina and coca? How many know that traditional Catalan thickeners include nuts, bread and chocolate, or that in this part of Spain, blending garlic and olive oil with honey and apples is the work of grandmothers rather than envelope-pushing, cutting-edge chefs?
And then of course there's fideuà, truly one of the overlooked glories of the Catalan repertoire. This poor cousin of paella, assembled from toasted noodles and seafood, has been sustaining Valencian fishermen for generations. It was originally prepared on board their boats in porcelain washbasins with whatever dregs the fishermen wouldn't be able to sell; nowadays, of course, it's gone considerably more upmarket and people stick all manner of fancy things into it. No matter how humble or exalted the ingredients, though, this dish really packs a flavor punch: slowly caramelized onions, tomatoes and garlic - called a sofregit in Catalan - provide a backbone for the rich, saffron-laced stock, the supple, nutty noodles, and of course the stars of the show, plump chunks of your favorite sea critters hiding underneath the crusty top. With top-quality ingredients this would be rhapsody-inducing enough, but those clever Catalans take it one step further and pair this masterpiece with another, namely a hearty dollop of their gutsy garlic-and-oil emulsion called allioli, a sauce so exquisite it would make 20-year-old Birkenstocks taste good. And all exaggeration aside, any cuisine that can boast a feat like that surely deserves to be recognized sooner rather than later.

Fideuà
I think the most important thing to remember about fideuà is that any recipe should be treated as a rough guide only, particularly when it comes to the seafood you put in. A mix of crustaceans, molluscs and fish is my favorite, but substitute as needed according to availability and preference. And do try your best to track down some shrimp complete with heads and shells - these make an incredibly flavorful stock and improve the complexity of the finished dish enormously. If you can't, though, just get ahold of the best fish stock you can - no bouillon cubes allowed!! Also, many people have asked me about paella pans over the years, so I'll tell you my preferences here, in case you happen to be in the market for one. The cheapest ones tend to be made from carbon steel, and while they work fine, they rust easily if food is left in them and/or they are not seasoned properly. I much prefer enamelled pans, which are affordable, don't rust and are much easier to clean and maintain. Nonstick pans are fine too, though they prevent that nice bottom crust from forming on the rice or noodles; heavy-gauge stainless steel is generally considered to be the best, but these also tend to be the most expensive. As for size, I used to have a 34cm (13-inch) pan, and found it a little small for the quantities I generally wanted to cook; now I use a 38cm (15-inch) pan and find it perfect for dinner parties of 4-6 people. If you'll regularly be cooking for more than that, go for something even bigger.
Serves: 6
about 1/2 cup (125ml) olive oil
about 1 lb (500g) fideo noodles, or angel hair pasta broken into 1-inch lengths
1 lb (500g) large shell-on raw shrimp (with heads attached, if possible)
2 tablespoons garlic, chopped, divided
10 cups (2.5l) fish stock (or 7 cups clam juice diluted with 3 cups water)
1/2 teaspoon saffron threads, crumbled
2 medium onions, finely chopped
4 canned plum tomatoes, drained and chopped
2 teaspoons sweet paprika
1 lb (500g) small clams, scrubbed, soaked in cold water for 2-3 hours with a tablespoon of cornmeal (discard any that don't close firmly when you tap them)
1 lb (500g) monkfish or other firm, white fish fillets, cut into 2-inch pieces
salt

1. Begin by toasting the pasta. Heat 2 tablespoons of oil in a 15-inch (38cm) paella pan or a large heavy (ovenproof) skillet over medium heat*. Add half the noodles and cook, stirring constantly, until they have turned a more or less uniform toasty brown. Watch them carefully as they burn easily. Remove from the pan to a large bowl, making sure none are left in the pan. Add 1 more tablespoon oil to the pan and repeat with the other half of the noodles. Remove these to the bowl as well.
2. Peel the shrimp, reserving their shells and heads (leave a couple with their shells and heads on to garnish the fideuà, if you like). Heat another 2 tablespoons oil in the paella pan or skillet over high heat and when hot, add the shrimp (both peeled and unpeeled) and half the garlic. Sauté just until the shrimp has turned pink, about 1 minute. Remove from the pan and set aside.
3. Make the stock. In a large, heavy-bottomed saucepan, heat 1 more tablespoon of the oil over medium-high heat. Add the shrimp shells and heads and stir until pink and fragrant, 2-3 minutes. Add the fish stock and saffron, bring to a boil, reduce the heat and let simmer uncovered until the stock has reduced to 6-7 cups, about 30 minutes. Before using, strain out the shrimp shells and taste for seasoning - it should be very well seasoned but not unpleasantly salty. Add more salt, or dilute with a bit of water, as necessary.

4. Meanwhile, preheat the oven to 400F/200C. Heat another 2-3 tablespoons oil in your paella pan or skillet over medium heat. Add the onions and cook slowly, stirring frequently and lowering the heat as needed, until they have softened and caramelized, about 25-30 minutes. Add a bit of water if they look in danger of burning. Add the tomatoes and continue cooking until the tomatoes and softened and caramelized and both onions and tomatoes seem to have melted together, about another 10 minutes. Add the remaining tablespoon of garlic and the paprika and stir until fragrant, about another minute or two.
5. Add the toasted noodles and stir gently to coat with the onion mixture. Add about 4 cups of the strained fish stock, stirring well to distribute everything. Using multiple burners and rotating the pan as necessary, bring the mixture to a boil over medium heat. Nestle the cooked peeled shrimp, drained clams, and fish pieces in the noodle and stock mixture. Add a bit more stock if there's not enough to mostly cover the seafood. Let cook on the stovetop, rotating the pan as necessary to heat everything evenly, until the noodles are getting al dente and most of the stock has been absorbed, about 7-10 minutes.
6. Pour another two cups of stock into the pan, arrange the whole (shell-on) jumbo shrimp decoratively on top, and transfer to the oven. Bake until the top of the noodles are crusty and most of the stock has been absorbed, about 10-15 minutes. Discard any clams that haven't opened.
Serve immediately, accompanied by plenty of lemon wedges and a large bowl of allioli.
*If you are going to be using a paella pan, to make things easier on yourself (particularly if your pan is quite large) you can perform all the steps through the making of the sofregit (step 4) in a skillet (doesn't need to be ovenproof), then transfer everything to the paella pan for the final stovetop and oven cooking. This reduces the amount of time you'll spend juggling the pan over multiple burners trying to get everything cooked evenly.
(Mock) Allioli
Real allioli is made by pounding garlic and salt in a mortar and slowly stirring in olive oil until an emulsion is formed. It can be tricky, and truth be told I like this much simpler version just as much. If you want to try your hand at the real thing, there's a good recipe here; for this version, just remember to start it at least an hour before you plan to serve it.
1 cup high-quality mayonnaise
1/4 cup olive oil
3-4 cloves garlic, pressed or crushed in a mortar
juice of half a lemon (or to taste)
salt to taste
1-2 tablespoons water (optional, for achieving a looser consistency)

Mix everything together and refrigerate, covered, for at least an hour to allow flavors to blend. This keeps a couple of weeks in the fridge.
 om the Blog: The Traveler's Lunch Box

Another recipe:

nutritional information

Per 2-cup serving:

  • Calories: 177
  • Protein: 6 g
  • Total Fat: 4 g
  • Saturated Fat: <1 g
  • Carbohydrates: 30 g
  • Cholesterol: 0 mg
  • Sodium: 182 mg
  • Fiber: 3 g
  • Sugar
 

Fideua
Serves 8
In Spain, special noodles are used to make this paella-like party dish, but angel hair pasta fragments work too. Break pasta strands 30 or so at a time to keep them from scattering. Broiling the dish is key to getting its crunchy texture. Serve with Quick Aïoli.
  • 2 Tbs. olive oil, divided
  • 8 oz. angel hair pasta, broken into 2-inch lengths (2 cups)
  • 1 medium onion, chopped (1 ½ cups)
  • 2 cups sliced wild mushroom mix (such as fresh shiitake, cremini, and oyster mushrooms)
  • ½ 8-oz. pkg. soy chorizo (1 sausage), halved and cut into ¼-inch-thick slices, optional
  • 1 small red bell pepper, cut into chunks
  • ¼ cup chopped fresh parsley, divided
  • 3 cloves garlic, minced (1 Tbs.)
  • ½ tsp. smoked paprika
  • 1 8-oz. can sodium-free tomato sauce
  • 2 cups mushroom broth or low-sodium vegetable broth
  • 8 oz. fresh asparagus, trimmed and cut into 2-inch pieces
1. Heat 1 Tbs. oil in wok, paella pan, or large skillet over medium heat. Add pasta, and cook 3 to 4 minutes, or until lightly browned and opaque, stirring constantly. Transfer pasta to paper-towel-lined plate to drain.
2. Add remaining 1 Tbs. oil to pan, and heat over medium heat. Add onion, and cook 3 to 4 minutes, or until soft. Stir in mushrooms, soy chorizo (if using), bell pepper, 2 Tbs. parsley, garlic, and smoked paprika, and cook 5 to 7 minutes, or until most liquid has evaporated.
3. Stir in tomato sauce. Add pasta, broth, and 1/2 cup water, and season with salt and pepper, if desired. Cover, reduce heat to medium-low, and simmer 5 minutes, stirring frequently. Add asparagus, and cover; simmer 3 minutes.
4. Preheat oven to broil. If using wok or skillet, transfer pasta mixture to 10-inch or larger round cake pan. Place paella pan or cake pan under broiler, and broil 3 to 4 minutes, or just until pasta is crisp on top. (Watch carefully—it burns quickly.) Sprinkle with remaining 2 Tbs. parsley.
June 2011 p.52


Romesco Sauce by Jen Hoy

This recipe for Catalan Romesco (Spanish roasted pepper and almond sauce) is one of hundreds of variations on a theme. Many people use tomatoes in their Romesco, but I like mine without. Toasted almonds and roasted garlic lend layers of flavor to this complex condiment that is fabulous served with fish, grilled tofu, and meats, but also with crudités or as a topping for bruschetta, corn cakes, or spinach patties. Romesco is as versatile as it is flavorful.

Prep Time: 5 minutes

Cook Time: 15 minutes

Total Time: 20 minutes

Ingredients:

  • 1 small head garlic, cut in half cross-wise
  • ½ cup toasted almonds
  • 3 large roasted red bell peppers, peeled and seeded
  • ½ teaspoon paprika
  • 1 tablespoon red wine or sherry vinegar
  • 4-5 tablespoons extra virgin olive oil
  • Sea salt and freshly ground pepper
  • 1 tablespoon chopped parsley for garnish (optional)

Preparation:

Preheat oven to 350’F.
Lightly brush the garlic with olive oil and place the halves cut side down on a small pan. Place the pan in the middle of the oven and roast the garlic for about 15 minutes, until it is soft. When the garlic is cool enough to handle, pop the cloves into the bowl of a food processor.
Add the almonds and pulse the mixture until it is ground fine.
Add the peppers, paprika, vinegar and 3 tablespoons olive oil, and process until the mixture is a thick puree. Add additional oil to reach desired consistency. Season to taste and serve sprinkled with chopped parsley.
Makes about 2 cups
Copyright 2010 by Jen Hoyhttp://video.about.com/spanishfood/Homemade-Romesco-Sauce.htm

Quinoto de Pavo

Holas: les presento una receta de mi amiga Meche Chiappe quien en sus propias palabras, les explicará su creación:
 
Ya que me descerebrado reconstruyendo lo que preparé hoy día (primera vez que lo hacía), aprovecho para enviarlo a mis hijos, sobrinas y amigos.
La quinua tiene muchísimas propiedades alimenticias y en lugar de hacerlo con arroz, Risotto, lo hice con la quinua perlada que venden embolsada. La suelta tiene muchas "basuritas". De allí que es el nombre de Quinotto y me salió bien rico. Van receta antes que me olvide:
QUINOTTO de PAVO
1 1/2 k. aprox. de pavo en trozos (pechuga) y le añadí dos presas de pulpa de pollo para aumentar el sabor. Las mariné varias horas con sal, ajos y comino 2 cdtas.)
ADEREZO.
  • 3 cebollas medianas picadas y licuadas, las "sudé" en olla con
  • 2 cucharadas grandes de ajo molido.
  • 1/2 taza de salsati o salsa de verduras (tipo tuco, pero no es tuco)
  • Después de "sudar" todo este aderezo, le añadí las presas de pavo cortadas grandes y aderezadas con sal, comino y ajos.
  • Le añadí a la olla de las presas unos 2 1/2 lts. de agua y lo dejé hervir por unos 40 minutos (hasta que estuviera suave, sin recocinarse). Separé las presas para que no se pasen de cocimiento.
  • Mantuve el caldo muy caliente.


En una olla aparte puse un poco de ajos con un poquito de aceite a dorar un poco, luego le añadí 1/2 k. de quinua, le di varias vueltas y comencé a echarle el caldo del pavo como unas 2 tazas cada vez. Se le sigue añadiendo el caldo muy caliente, moviendo de rato en rato, a fuego bajo.
Cuando al mover con la cuchara de palo, casi que se puede ver el fondo de la olla, se le va añadiendo caldo muy caliente, de a pocos. Apenas esté cocida la quinua (no recocinarla) le añadí 1/2 tarro ce crema de leche y buena cantidad de queso parmesano.
Cada plato lo serví con parmesano encima, con su presa de pavo (trozos de pechuga). También se las pueden añadir el pavo dehilachado pero en trozos gruesos, no muy delgados.
Champignones picaditos alrededor (al gusto).
Quedó muy rico.
Lo pueden preparar con lo que quieran, sólo con alcachofas, o pollo, o carne. Lo que se les ocurra.
Hasta puede ser con zapallo solamente. Es de acuerdo a lo que se les antoje y al bolsillo.
besos
Meche
Ya no ya!!! va hasta con las propiedades benéficas de la quinua. No pueden pedir más!!!

Propiedades de la quinoa para adelgazar

Beneficios de la quinua para perder peso

Propiedades de la quinoaLa quinoa también conocida como quinua es un cereal que posee múltiples aplicaciones medicinales, dentro de las cuales se destacan sus propiedades para adelgazar. Gracias a su valor nutritivo y principios activos, la quinoa ofrece beneficios para perder peso y por ende, para prevenir enfermedades concomitantes de la obesidad, como las cardiovasculares, la diabetes y las hiperlipemias, entre otras.

La quinoa es un cereal proveniente del continente americano, el cual es utilizado en forma habitual dentro de la alimentación diaria.
La quinua presenta en su composición química por cada 100 grs:
  • Calorías: 350
  • Proteínas: 12 grs, dentro de las cuales podemos mencionar aminoácidos como: valina, leucina, tirosina, metionina, isoleucina, fenilalanina, etc.
  • Grasas: 6 grs, dentro de las cuales encontramos ácidos grasos monoinsaturados (oleico, linoleico, etc).
  • Hidratos de carbono: 53 grs
  • Fibra dietética: 7.8 grs
  • Vitaminas: Vitamina A, vitamina E, tiamina, riboflavina, vitamina C.
  • Minerales: Zinc, hierro, manganeso, potasio, calcio, etc.


Esta amplia variedad de macro y micro nutrientes le otorgan a la quinoa, beneficios para perder peso.
Propiedades de la quinoa para adelgazar
  • Posee un alto porcentaje de fibra dietética total (FDT), lo cual la convierte en un alimento ideal para lograr eliminar toxinas y residuos que puedan dañar el organismo. Por lo tanto actúa como un depurador del cuerpo.
  • Produce sensación de saciedad. El cereal en general y la quinoa en particular, tiene la propiedad de absorber agua y permanecer más tiempo en el estómago de esta forma logras plenitud con poco volumen de cereal.
Además de estos beneficios para perder peso, la quinoa posee otras propiedades medicinales, tales como:
  • En caso de celiaquía, es una harina muy tolerada y utilizada.
  • Ayuda a controlar la glucemia.
  • Previene enfermedades cardiovasculares como la ateroesclerosis.


La naturaleza nos brinda a través de los alimentos, la posibilidad de mantenernos saludables. Es importante tener en cuenta que cuanto más sano comas incorporando buenos hábitos, como no fumar, no beber, mejor será tu calidad de vida.
Si necesitas recurrir a una dieta baja en calorías puedes incorporar una porción de quinoa a tu menú diario y de esa forma, lograrás perder peso sin perder energía.